VR headsets can be pretty awesome at simulating monitors of any size and shape. Most VR headsets are also capable of outputting at a high refresh rate (60hz, 90hz, 120hz, or even 144hz). Some headsets (like Apple Vision Pro) can also output in HDR!
The beauty of it all is that in VR, you can simulate what it’s like to have an ultrawide, 4k, high frame rate, and HDR monitor without even owning one.
Why simulate a monitor?
Typically when streaming a PC monitor to VR (or to any other client), you’re limited to the physical specs of the monitor. If the monitor is 60hz, then you’ll be streaming at a maximum of 60hz.
Enter: virtual display drivers—A way to create a fake monitor on demand. The best part is that you can set the monitor specs to be anything! Wanna create an 8k monitor running at 144hz? Sure! (your GPU won’t be too happy though).
Streaming background info
Unlike Mac Virtual Display, a native VisionOS and MacOS feature which lets you stream your Mac’s monitor to your Vision Pro, on Windows, we’ll be using:
- Sunshine as the hosting solution (the software capturing your PC’s monitor and streaming it).
- Moonlight to streaming client (the app on your device that’s connecting to your PC and receiving the stream).
It sounds complicated but trust me, but once it’s set up (instructions bellow), it’s pretty straightforward.
FYI, Sunshine + Moonlight is a super popular open-source streaming solution that’s supported on so many devices. Everything from Windows, MacOS, Linux, Rasberry Pi, Apple TV, Chromecast, Android, Amazon FireOS, Xbox One, Nintendo Switch, Wii U, and even LG WebOS. The background Sunshine + Moonlight is that it’s the open-sourced version of NVidia’s Gamestream technology that’s now been deprecated, and as a result, this streaming solution has become ubiquitous. If you’re curious to learn more about the story, read this ArsTechnicha article.
Setting up Apollo
Apollo (on-demand virtual monitor solution)
Although the default Sunshine app is the more common way of streaming your Windows PC, I recommend using Apollo (a fork of Sunshine).
Apollo has a native virtual display driver which it activates on-demand (aka, it creates a monitor when you’re connecting to your PC to stream/play) and then disables it when you’re done. This is way more convenient than having a virtual monitor active at all times, or needing to dig into Device Manager every time you want to active and de-active the monitor.
Apollo also creates a monitor with the specs that the streaming client requests. It follows the streaming settings in your Moonlight app, so you can request the virtual monitor to be a 4k, 90hz, HDR display, it creates a monitor that follows those specs.
Note: Apollo warns that HDR doesn’t work too well. In my opinion, it works perfectly fine with Windows 11. The problems arise more from how Windows handles SDR content on an HDR-enabled display, so I recommend only using HDR when playing HDR-supported games with an HDR monitor (like Vision Pro).
- Install the latest Apollo release
- Install Moonlight XrOS via Testflight on Apple Vision Pro.
- Pair your PC as a connection in Moonlight
- Option 1: Automatically
- Your PC should show up automatically in the Moonlight list, in which case,
- select it, go to your PC, go to the Apollo/Sunshine web admin portal > Pin Pairing and type in the pin that Moonlight provides.
- Your PC should show up automatically in the Moonlight list, in which case,
- Option 2: Manually
- If your PC doesn’t automatically show up in Moonlight (which was the case for me), you’ll need to add it via its IP address manually
- on your PC, open up Command Prompt, and type in
ipconfig. - Copy the IPv4 Address (192.168.XX.XXX)
- in Moonlight on AVP, select the + icon and type in the IP address.
- on your PC, open up Command Prompt, and type in
- Select your PC in Moonlight, go to your PC, go to the Apollo/Sunshine web admin portal > Pin Pairing and type in the pin that Moonlight provides.
- If your PC doesn’t automatically show up in Moonlight (which was the case for me), you’ll need to add it via its IP address manually
- Option 1: Automatically
- Pair your PC as a connection in Moonlight
- Set up streaming/monitor settings
- Go to the Settings within Moonlight,
- depending on your GPU, router, set these settings:
- resolution: 1080p/4k/ultrawide
- refresh rate: 60/90 (AVP can only go up to 90fps)
- HDR: enabled
- Once you connect to your PC, you’ll need to enable HDR in the windows Display Settings.
- depending on your GPU, router, set these settings:
- Go to the Settings within Moonlight,
- Stream
- By default, Moonlight has three options to connect to
- Desktop, Steam Big Picture
- Selecting either Desktop and Steam Big Picture, Moonlight will stream your default main monitor without creating a virtual monitor, and will be limited to the physical specs of your monitor.
- I recommend using these options for non-HDR or >60fps games.
- Selecting either Desktop and Steam Big Picture, Moonlight will stream your default main monitor without creating a virtual monitor, and will be limited to the physical specs of your monitor.
- Virtual Display
- If you Select Virtual Display, Apollo will create a virtual display based on the streaming settings you’ve selected in the Moonlight Settings.
- Go to Display Settings in Windows
- enable “Make this my main display”
- enable HDR (and Auto-HDR).
- Desktop, Steam Big Picture
- By default, Moonlight has three options to connect to
- Set your virtual monitor as “primary display”
- Display settings > select the virtual monitor > expand “multiple displays” > select “Make this my main display”
- this will make games and windows open up on your virtual monitor
- Display settings > select the virtual monitor > expand “multiple displays” > select “Make this my main display”
- Launch your game and play!
- Controller
- You can connect your BT-enabled (Xbox/PS controller) either to the Vision Pro or directly to your PC. Both work!
- Controller
- Disconnect/Disable virtual monitor
- to disable the virtual monitor, exit out of the moonlight stream, press and hold on “Virtual Display”, and select “Quit”.
Disabling physical monitors when the virtual monitor is active
Oftentimes with multi-monitor setups, games and windows might pop up on the wrong monitor when launched (despite the fact that you set your virtual monitor as the primary monitor).
The best way to mitigate this is to software disable your physical monitors in windows and have your virtual monitor be the only active display.
How? Windows 11 saves monitor/desktop configurations depending on what monitors are plugged into your PC. That includes monitor orientation, relative positions, and active/inactive states. Here’s how you should set this up:
- Connect to your PC via moonlight using the Virtual Desktop option
- Open Display Settings
- select your physical monitor(s) > Extend these displays > Disconnect this display
You should now only see your virtual display as active! When you’re done using it and when you disconnect (by “Quitting” the virtual desktop app on Moonlight), the physical monitors will re-enable themsleves and you can proceed to use your PC as usual.
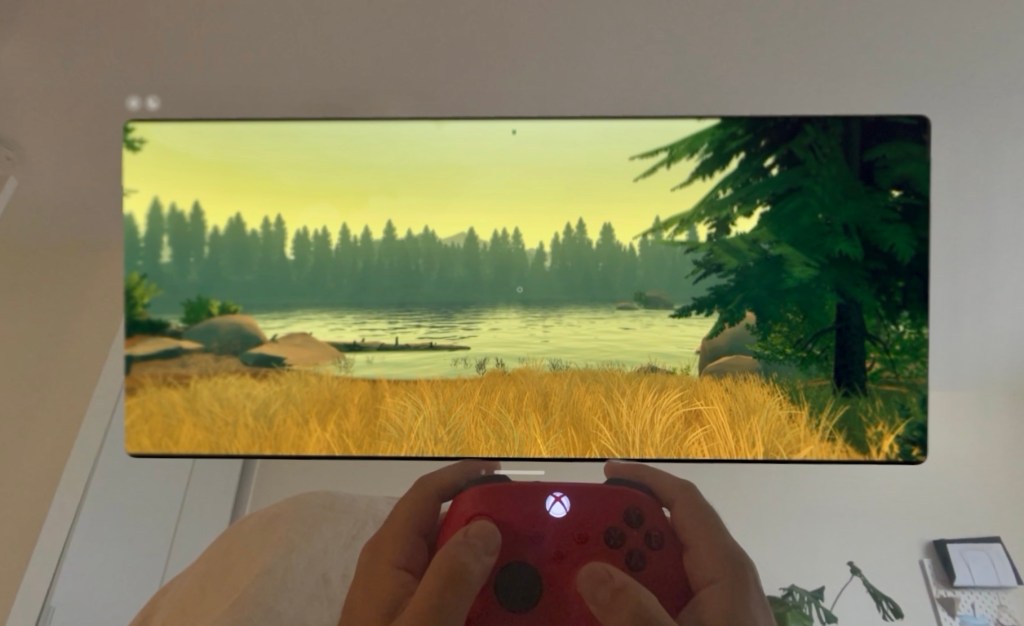
Here’s what it’s supposed to look like when it works!
Troubleshooting
- Stuttering / audio-glitching
- Bitrate
- This typically means that you’re trying to stream at too high of a bitrate for your PC or network to handle.
- In the moonlight settings, reduce your bitrate down to 50bmps
- This typically means that you’re trying to stream at too high of a bitrate for your PC or network to handle.
- Rhythmic stuttering
- If you experience rhythmic stuttering with Moonlight, change to Channel 149 for 5Ghz on your router (source). Worked for me!
- Bitrate
